
JPEG Optimization Algorithms ReviewJPEG is probably the most frequently utilized image format in the world, so the idea about JPEG Optimization software could be valuable for many applications. Every day billions of JPEGs are created with smartphones and these pictures are stored somewhere. Much more JPEG images are displayed on different sites and they generate huge internet traffic. It means that the question about file size for JPEG images is essential. As soon as JPEG Standard doesn't specify everything for JPEG encoding, then we could look for existing methods to improve image quality and compression within that Standard.
Offline JPEG recompression could be really useful to take less storage for acquired images. This is critical issue for web applications where we need to reduce page load time, to improve user experience, to decrease traffic and bandwidth cost. In general we need to solve the task how to get the best JPEG image quality for specified file size. We consider for review several methods for JPEG optimization software. We will focus on ideas and algorithms to achieve better JPEG compression. That review deals only with those algorithms which are fully compatible with JPEG Standard. The main idea about JPEG optimization software looks quite simple. If we have a compressed JPEG image, we need to offer the best possible compression and quality. Actually we have to take into account all available requirements concerning image quality, file size, processing time, ease of use, etc. If we already have JPEG image, we still can ask themselves: can we improve JPEG compression without adding additional artifacts or with a small distortion, to make file size less? Quite often the answer is positive and below we consider how it could be done in detail. JPEG artifactsTo discuss JPEG optimization techniques, we need to start from understanding of JPEG artifacts. We could easily identify stages of JPEG compression algorithm, where we could get image losses: Color Transform from RGB to YCbCr, Subsampling, Discrete Cosine Transform (DCT) and Quantization. All other processing stages in JPEG algorithm are lossless: Zigzag, DPCM, RLE, Huffman. Eventually, lossy methods give rise to image artifacts which are common for JPEG algorithm:
All these artifacts are the consequences of lossy stages of JPEG algorithm. That's why any JPEG optimization approach should take them into account. We will visually check image quality for each optimization step to understand how distinct algorithms and parameters could influence on these artifacts. How we could optimize JPEG Encoder?Below we discuss several ways to control standard JPEG encoding. We will consider JPEG Baseline part of the Standard and Progressive option. These are parameters and algorithms which strongly influence on JPEG file size and image quality:
JPEG quality factorThat factor, which is called "q", was introduced in JPEG Standard to implement scaling for quantization tables. Actually we have a formula which is converting each value of quantization table according to that scaling coefficient. Within that approach q = 100 means no quantization and in that case we get the best image quality (the lowest level of distortion) for JPEG compression algorithm, though this is not a lossless compression, we still have very small distortion due to roundings in Color and DCT transforms. For smaller values of q we get better compression ratio with some quality degradation, and this is user's responsibility to choose appropriate value of q for the current task. Usually, the same q is applied both to luma and chroma, though it's not forbidden to utilize different values for each color component. It is possible to control the chroma quality by setting the second quality value, as in Mozilla JPEG project: it could be "-quality 90,80" and it will apply quality 90 to the luma (Y) component and 80 to the chroma components (both Cb and Cr). The formula to convert quantization tables according to JPEG quality factor q is not included in JPEG Standard. We can choose our own way of quantization table transform which could be more appropriate in comparison with the Standard. This could be the way to improve image quality and compression ratio if we know how to take into account image content to create such a quantization table and such a transform. We believe that the name "JPEG quality factor" is somewhat misleading because this is actually not a quality factor, but this is a scaling coefficient to scale initial quantization table to get resulted table to be applied to DCT coefficients of each 8×8 block. JPEG subsamplingAccording to the results of numerous experiments, Human Visual System (HVS) has different responsivity to luma and chroma. People see luma signal with much better resolution in comparison with chroma. This is the ground why we can remove some detail from chroma and still see the picture with almost the same quality. We can do that by averaging values of Cb and Cr components horizontaly, vertically or both. The most frequently utilized subsampling modes are 4:4:4 (no subsampling), 4:2:2 (horizontal subsampling) and 4:2:0 (horizontal and vertical subsampling, so that from one block 16×16 we get four 8×8 blocks for Y component, one 8×8 block for Cb and for Cr right after subsampling). This is essentially lossy operation and we will have to restore lost data at the decoding stage. That's why we can restore chroma data approximately if we applied subsampling during encoding. There are some more subsampling modes apart from widly utilized 4:4:4, 4:2:2 and 4:2:0. Nevertheless, they are quite rare. JPEG quantization tables for luma and chromaAccording to the Standard, user has to define quantization tables 8×8 to apply them to the results of Discrete Cosine Transform. Basically, at JPEG encoding, we divide each value of 8×8 DCT block to corresponding value of quantization table and then we round the result. This is the way to get lots of zeros in each DCT block, which is very good for further compression with RLE and Huffman algorithms. Though quantization tables are not defined in the Standard, there are two tables which are widely utilized. These are quantization tables for luma and chroma. They are different, but in general case they are scaled with the same coefficient which is actually JPEG quality factor. We have a linear function F(x) = (200 - 2*x) / 100 which generates scaling coefficient to be utilized to calculate a new quantization table. If JPEG quality is equal to 100, it means no quantization and in that case quantization value for each element is equal to 1. Division to 1 doesn't affect any DCT block, so it's the same as no quantization. If JPEG quality is equal to 50, then we get the following tables: 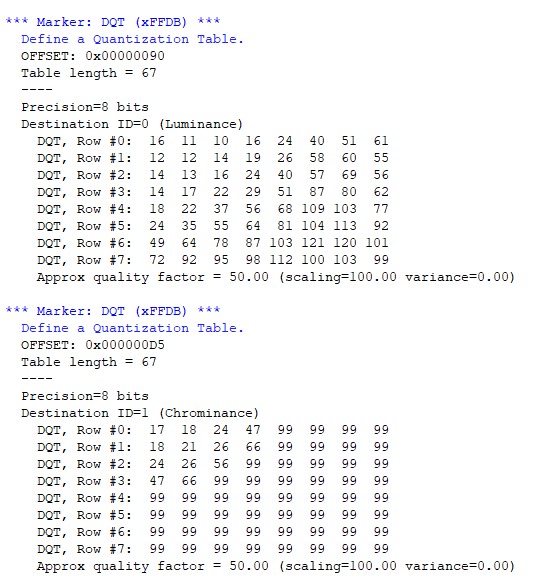
Fig.1. Standard JPEG Quantization tables for luma and chroma (q = 50) As we can see, Standard Quantization table for luma (luminance) is not symmetrical and is not monotonuous in frequency domain, though it's symmetrical and monotonuous for chroma. There is no strict proof for that issue and it looks like HVS responsivity for luma is not isotropic. Standard JPEG Quantization tables were derived in the past from the processing of some image set, so it could be a problem of that set as well. There are some other models which utilize symmetric luma tables and anyone is free to implement and to test such an approach. JPEG quantization algorithmsQuantization algorithm is not defined in JPEG Standard and we can actually implement any algorithm in JPEG encoder. To make it compatible with JPEG decoder, we just need to create quantization tables which will allow to restore original image and save them in file header. There are quite a lot of software models to generate quantization tables with the software. The most simple approach relies on the fact that for higher spatial frequencies we need to get bigger amplitude in quantization table. This is reasonable approach, though not really popular. It's quite difficult to test such a solution to prove that it's correct not for just available evaluation set of images. More viable approach is based on the idea to find the best quantization table for a particular image. This is multi-parameter task and it's very complicated, as soon as the total number of possible solutions is just huge. Still, there are some methods which could help to find a good solution for that task. MIN and MAX values in JPEG quantization tablesIf we have a look at any quantization table, we can easily find minimum and maximum values in the table. Minimum value is usually somewhere around upper left corner, and maximum is not necessary in the right bottom corner either. Sometimes MAX value could be very close to that position and it reflects the idea that in some cases the strongest HF suppression should be done not for the highest spatial frequency. For Standard JPEG Quantization tables for q = 50 from Fig.1 we see that for luma MIN = 10 and MAX = 121. For chroma MIN = 17 and MAX = 99. As soon as we divide each DCT block to quantization matrix, then minimum value of that matrix defines minimum bit depth reduction for all DCT coefficients. If in the source file we have 8-bit RGB data, then after DCT we get 10-bit DCT coefficients. Division of DCT values to quantization table leads to more compact representation of DCT data at encoding, that's why minimum and maximum values from quantization table shows us the limits of data reduction (bit depth reduction) at that step. This is actually very interesting subject, why we have data size increase after DCT and why it's necessary for an algorithm which is intended for data compression. DCT representation is capable to be compressed significantly, so initial data size increase is temporary and we still have excellent chances to get data reduction due to further compression. Optimization of Huffman AC and DC tablesIn JPEG compression algorithm we utilize Huffman encoding method right after RLE to reduce data size by replacing fixed-size codes with variable-length codes. In many cases, JPEG encoders utilize Standard Huffman tables for DC and AC coefficients (both for luma and chroma) which are exactly the same for different images. These tables could be optimized for any particular image and in that case we could achieve better compression ratio without introducing any additional losses, because Huffman encoding is lossless algorithm. We just need to get image statistics to create optimized AC and DC Huffman tables. Many software have "-optimize" parameter which is responsible for that procedure. Such an optimization could bring us around 10% of additional compression, so it's worth doing, but the software will work slower with that option on. There is also an option for JPEG optimization due to special Huffman tables which is connected with expected JPEG quality level. One could compose Huffman tables specifically for different values of JPEG quality. We can evaluate frequency distribution of Huffman codes for different JPEG quality values and create several Huffman tables which depend on JPEG quality level to get better compression. Please note that this is a statistical method, which improves compression ratio but doesn't account for the image content. Processing of any supplementary info in JPEG imagesEach JPEG image could have metadata, comments, embedded thumbnail, built-in markers, EXIF info in the file header. That data could be of no importance if we need to make JPEG image as small as possible. The software could remove all that data to decrease file size. This is not always reasonable and user has to be careful to make right decision with such a method. Removal of EXIF section could offer significant file size reduction for small JPEG images, but for big images it's not really an issue. ICC profile could also be embedded into JPEG image. In many cases this is default sRGB, so we can remove it to get less file size. RST markers (restart markers) in the JPEG Standard could help us with faster JPEG decoding. Presence of RST markers increases file size and this is crucial issue to define optimal number of such markers in the image. Each restart marker is 2-Byte value. If we are not going to utilize fast JPEG decoding for the image, there is a point to remove all restart markers to reduce file size. When we use RST markers, we have one more issue which influences on file size of compressed image. In JPEG Standard there is a procedure which is called "padding". If for MCU encoding we need a certain number of bits which is not a multiple of 8, then we have to fill spare bits with "1". Such a situation happens before each restart marker and we could loose several bits before each marker. Without RST markers it could happen just once, at the end of file. As soon as RST marker starts with FF, then we need to do so-called "byte stuffing" - to write FF00 instead of FF in the bitstream. If we don't have restart markers, then we don't need to do byte stuffing and this is one more way to make file size less. If we have RST markers in JPEG image, then we start doing DPCM differential coding for DC coefficients right after each RST. If we don't have restart markers, then differential coding is continuous and we spend less bits for DC coefficients, so we decrease file size. Perceptual quality measures to increase the perceived quality of JPEGsTo implement any lossy compression algorithm, we need a metric to control distortion level for compressed images. The most simple choices are MSE (Mean Square Error), PSNR (Peak Signal to Noise Ratio) and MPE (Mean Pixel Error), etc. These are very simple algorithms which don't account for HVS (Human Visual System) properties. To solve the matter, SSIM was introduced. SSIM means Structural Similarity and that metric shows the extent of resemblance between two images. It was proved that in many cases SSIM turned out to be more precise and reliable in comparison with MSE/PSNR to distinguish perceived differences. Now we can do JPEG compression and decompression and then calculate resulted SSIM to evaluate distortion level. With such an instrument we can automatically test different parameters to achieve better JPEG compression. The primary use case of JPEG optimization software is smaller file size, it can also be used to increase the perceived quality of JPEGs while keeping the file size the same. That approach could bring us closer to real human perception, and that understanding will let us improve both compression ratio and image quality. Image preprocessingJPEG compression is always burning out spatial high-frequency (HF) detail from each 8×8 block and such a removal is non-reversible. This is one-way road and if we apply such a transform several times, we gradually enforce image distortion and there is no any method for data recovery. Any transform of JPEG encoding and decoding leads to some distortion, even if we don't apply any quantization. In general, main reasons of JPEG image distortion are roundings and quantization. After DCT and Quantization we can evaluate acceptable distortion level for each block 8×8 according to SSIM metrics for original and quantized/dequantized DCT blocks. Then we can classify blocks as having high / average / low HF detail. As soon as we are going to apply the same quantization table to each block, we see that for some blocks we could apply much stronger quantization. That's why we can create three (or more) temporal quantization tables to be applied to each block (both direct and reverse quantization), depending of HF detail presence. After that action, all processed blocks will have less HF detail because they are burned-out. Now we can apply standard quantization table and we will get better compression for these blocks and eventually it will improve total compression ratio for a particular image. Still, we need to check quality metrics to be sure that we are within allowed limits for image quality. We can also use, for example, trellis quantization method. Trellis quantization is an adaptive quantization algorithm for DCT-based encoding that selects the set of levels for each transform block to minimize rate-distortion metric. That aproach was implemented at MozJPEG project and this is the way to improve compression ratio, though it's very slow. Eventually, at the decoding stage we will restore the image with quantization table which is in JPEG header and we will do that for the whole image. It means that trellis quantization helps us to remove some data from the image and it's done right after we apply quantization table. Trellis algorithm actually performs rate-distortion optimization for quantized DCT coefficients prior to entropy encoding. Other techniques (deblocking, quality metrics, quantization table generation)Finally, all optimization methods are mostly rely on content-based image compression. By taking that into account, it's possible to create individual quantization tables which will be applied to the whole image. JPEGmini software is based on patented method, so please bear that in mind. JPEGmini calculates three internal metrics (PSNR, Texture and Blocking) together with their own algorithm for iterative generation of quantization tables. Deblocking metrics helps to cope with JPEG boundary artifacts which could arise due to stronger quantization. At the output, user gets optimized JPEG image with individual quantization table which differs from Standard JPEG quantization table for Y. Progressive JPEG vs Baseline JPEG to get better compression ratioProgressive coding is a part of JPEG Standard. In progressive coding of the DCT coefficients two complementary procedures are defined for decomposing the 8×8 DCT coefficient array, spectral selection and successive approximation. Spectral selection partitions Zigzag array of DCT coefficients into “bands”, one band being coded in each scan. Successive approximation codes the coefficients with reduced precision in the first scan; in each subsequent scan the precision is increased. A single forward DCT is calculated for these procedures. When all coefficients are coded to full precision, the DCT is the same as in the sequential mode. Therefore, like the sequential DCT coding, progressive coding of DCT coefficients is intended for applications which need very good compression for a given level of visual distortion. The simplest progressive coding technique is spectral selection because of its simplicity. Note, however, that the absence of high frequency bands typically leads (for a given bit rate) to a significantly lower image quality in the intermediate stages than can be achieved with more general progressions. The net coding efficiency at the completion of the final stage is typically comparable to or slightly less than that achieved with the sequential DCT. Much more flexible progressive system is attained at some increase in complexity when successive approximation is added to the spectral selection progression. For a given bit rate, this system typically provides significantly better image quality than spectral selection alone. The net coding efficiency at the completion of the final stage is typically comparable to or slightly better than that, achieved with the sequential DCT. In general, Baseline JPEG and Progressive JPEG are parts of the JPEG Standard and they use the same methods for entropy encoding and decoding (DPCM which is DC delta coding, RLE, Huffman coding), but they are applied to different entities. In Baseline JPEG they are applied to quantized DCT coefficients from AC1 to AC63, but in Progressive JPEG they are applied to AC bands of quantized DCT coefficients (either spectral selection or successive approximation), which leads to different compression ratio. Compressed file size is content-dependent, so there is no exact answer which compression is stronger. In many cases Progressive JPEG gives better compression ratio in comparison with Baseline JPEG and to get fair results we need to compare the same modes for different software. For example, mozjpeg software is using Progressive mode by default and any comparison with other software should take that into account. Sure, mozjpeg could produce Baseline images as well, but this is not default mode of operation. Removal of higher bands from DCT coefficients could bring us even better compression ratio, though it's closely connected with additional image quality losses. Performance of JPEG optimization softwareThis is quite important issue to understand how fast we could perform such an optimization. As soon as most of the cited algorithms are quite complicated and computationally intensive, we could expect slow performance and this is exactly the case. Some software could be very slow, like Google Guetzli, which does a good job, but it's far from being fast, unfortunately. High quality solutions like JPEGmini are doing very well in terms of image quality, but they have iterative algorithms which are not really fast. The authors of JPEGmini state that their algorithm converges quickly, and we've got the performance about several dozens of MPix/s for our test images at our hardware. Mozjpeg, which is based on fast libjpeg-turbo, doesn't have the performance of libjpeg-turbo, it's much slower, because it's focused on optimization and interface tasks, not on the performance. We can run such a software on different threads/processes on CPU, though the performance is an issue if we need to utilize such a solution for high load services. According to our tests, the performance for CPU-based JPEG optimization software is usually in the range of several dozens of MPix/s. This is fast enough if you need to optimize a small set of your photos or several hundreds of images for your site. If we consider the case with much higher load and continuous operation, the performance could be the main bottleneck. How to achieve very high compression ratio with JPEG codec?This is very interesting question and it mostly concerns applicable limitations for JPEG algorithm. That algorithm was created with the idea of HF detail suppression for natural images. If we apply very low JPEG quality factor to get strong compression ratio, we definitely get severe blocking artifacts and posterizing. Decent compression ratio could reach 10-15-20 times, not more. If we still need to get stronger compression, it would be wise to combine Resize (downsize) with JPEG encoding, but Resize should be implemented first. If we apply Resize 50% both to width and height, then we will get additional 4-fold compression and final image will have smaller resolution. Despite the fact that compressed image looks smaller now, it doesn't have unacceptable aftifacts and we can see the picture quite well apart from HF objects which could be lost during Resize. An attempt to get 50-fold compression ratio for JPEG encoding without Resize, will probably give you low quality image and you will see annoying blocking artifacts and posterizing which make the image look really bad. If we need to get very high compression ratio for JPEG encoding and we also need to display the image with original resolution, we could apply Resize (downsampling) + JPEG to get high compression and before visualization we could apply Resize with upsampling. The resulted image will be somewhat blurry, but it will not have blocking artifacts. This is not the best choice, but decent solution. Please note that upsampling could be done on GPU via OpenGL, so it could be implemented automatically without any additional load for your CPU. That idea could help you when you will be in need for very strong image compression. Combination of Resize and JPEG encoding is an excellent choice for such a task. There are several image compression algorithms which could offer better compression ratio or image quality in comparison with JPEG, but the difference with JPEG is not really big. That's why we would suggest to evaluate Resize + JPEG approach. JPEG optimization tricks which you need to be aware ofThe most common situation in image optimization software is misrepresentation of JPEG quality factor q or subsampling mode. For example, user could believe that JPEG compression is done with quality q = 80, though in reality it's done with q = 70. In all cases, JPEG compression with q = 70 will give us less file size in comparison with q = 80 for the same image, subsampling mode and the same quantization tables. There is very simple method to check that issue. You can download the software JPEGsnoop to visualize exact JPEG quality factors both for luma and chroma for available image together with applied quantization tables and Huffmen tables. To check the issue with subsampling, we can run mozjpeg software with the following command line: cjpeg.exe -quality 90 -quant-table 6 peppers.bmp > peppers90.jpg It will perform JPEG compression with quality 90 and 4:4:4 subsampling, though the following command line cjpeg.exe -quality 89 -quant-table 6 peppers.bmp > peppers89.jpg will perform JPEG compression with quality 89 and 4:2:2 subsampling. This is unexpected behaviour of the software, when such a small change of JPEG quality factor leads to much better compression, though it could be easily checked by JPEGsnoop or any other software. Subsampling change from 4:4:4 to 4:2:2 offers substantial boost in JPEG compression ratio, and it would be a good idea to do that explicitly. Non-standard grades instead of JPEG quality factorThe same issue could be more subtle. You can run into non-standard approach which substitutes JPEG quality factor, like 12 grades for JPEG compression in Adobe Photoshop which has its own quantization tables. Such an approach does make sense, but it's far from widely utilized JPEG Standard and now you will need JPEGsnoop once more to check what's inside each JPEG image. Just do that and you will know what does it mean "Quality for Web" preset value in terms of standard JPEG compression quality factor, subsampling and quantization tables. 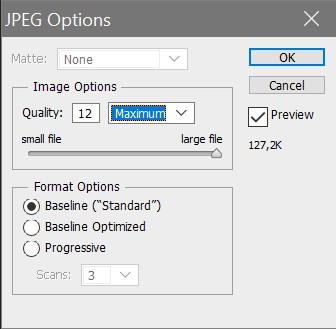
Fig.2. Photoshop SaveAs to JPEG option Let's do very simple test to visualize what's going on with Adobe Photoshop when it comes to JPEG compression. We can take the same source image peppers.ppm and compress it with JPEG Baseline with grade 8. Initial file size is 576 kB, compressed image is 56.2 kB. Then we take that compressed image as a new source, open it with Photoshop and try to recompress it with quality grade 12 (this is the highest quality). We see a big surprize here - now the size of compressed image is about 192 kB, though we haven't introduced any new detail to the image. To clear up the issue, we take JPEGsnoop software and can easily find the answer. Photoshop has applied the same subsampling 4:4:4 to the 8th grade and to the 12th grade, but utilized quality factors are different:
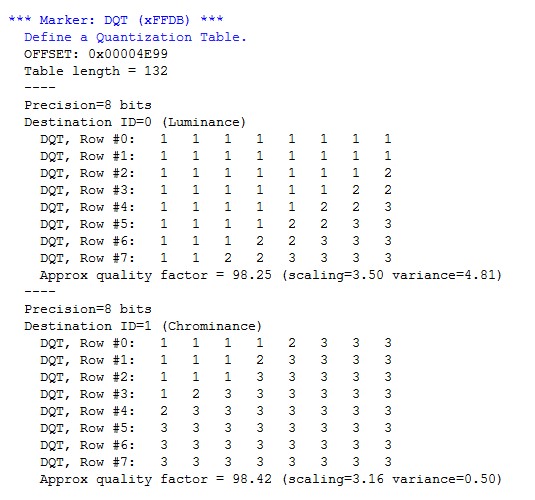
Fig.3. JPEG Quantization tables for luma and chroma for 12th grade of Photoshop Stronger quantization leads to better image compression which we finally see as JPEG file size. If we apply weaker quantization (12th grade) at JPEG recompression, we will need more bits for every DCT coefficient which leads to bigger file size. This is an illustration for the fact that JPEG is not good as intermediate format. We have an impression that the image has maximum quality because it was compressed with the 12th grade, though it was originally compressed with the 8th grade and we can't see any info about that. In that case some distortion to the source image has already been introduced and it can't be recovered. This is actually a good indication of what should be done by good JPEG optimizer software. The software should be able to discover maximum JPEG quality factor and corresponding quantization tables which will not add extra distortion to that particular image. And an attempt to compress that image with the 12th grade should be substituted with the 8th grade instead. This is a minimum requirement for a good JPEG optimization software. It should be also able to reach better compression without extra quality losses in many other cases. Non-standard quantization tablesAnother way of misrepresentation is connected with non-standard quantization tables. Most of manufacturers have created their own quantization tables which could be more appropriate for their image sensors, cameras, scanners and other imaging equipment. This is quite reasonable approach. Here you can see such quantization tables for cameras from Nikon, Canon, Sony, Olympus, etc. Still, if you work with such JPEG images, you will need to get new experience to understand correspondence between JPEG quality factor, compression ratio, image artifacts and perceived image quality. If you edit such JPEGs in other popular editors, you can apply Standard Quantization tables instead of original and after storing the compressed image, you could be surprized with unexpected changes in file size and image quality. 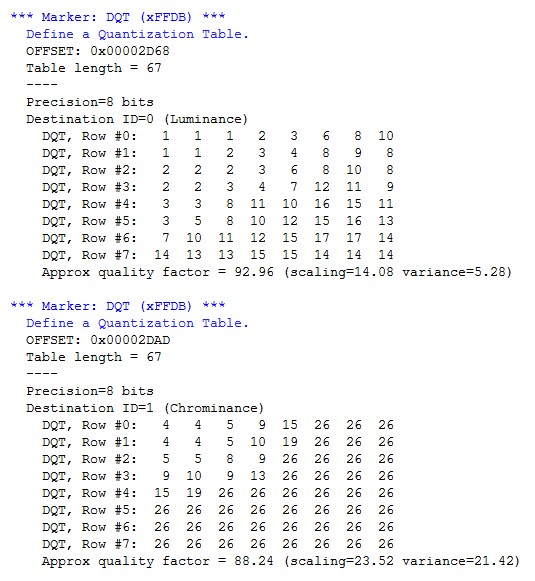
Fig.4. JPEG Quantization tables for luma and chroma from Canon PowerShot G7 camera
Below we can see embedded quantization tables from Apple IPhone XR which could be considered alike Standard with q = 76 for luma and q = 78 for chroma (this is also not an exact match, but just an approximation). We should also note that Apple in that camera applies chroma subsampling 4:4:4 by default. 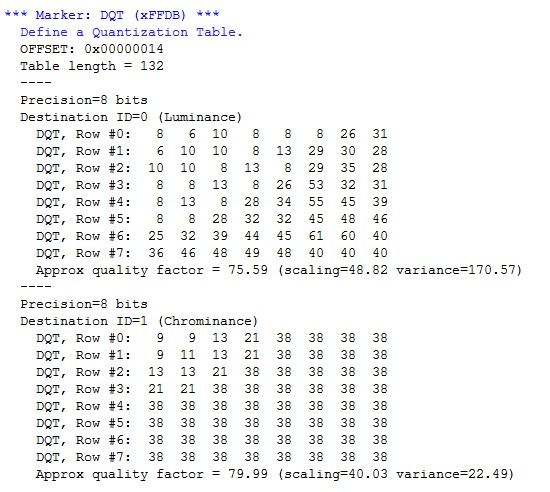
Fig.5. JPEG Quantization tables for luma and chroma from Apple IPhone XR camera Apart from that, for example, mozjpeg software can take quantization table as a parameter and in that case we just can't expect that standard JPEG quality factor will produce the output that we could usually expect, because quantization table could be different from a Standard one. Utilization of custom quantization table changes the standard approach of JPEG compression, so the result will be different. Advertizing and JPEG optimization softwareThe most strange situation is connected with advertizing and promotion in the field of JPEG optimization and image recompression. In most cases, advertizing "facts" about JPEG optimization software are quite far from being real. As a starting point for optimization we usually see images with minimum compression. In terms of standard JPEG quality factor, they are usually in the range of 97-100, which means very high image quality, low compression ratio and quite big file size. This is the reason why you can see slogans which promise you to cut-off 80% or even more from your source JPEG file size. None of that could be true if your original JPEG image has already been compressed with standard JPEG parameters for so-called "visually lossless compression". In many cases it means Standard JPEG quality factor q = 90 or less, and subsampling 4:2:0. Such a comparison will help you to realize authentic level of optimization which could be delivered with any JPEG optimization software. You can do your tests with JPEGsnoop software to check what's inside each source and target images. We believe that correct estimation for JPEG optimization efficiency could bring file size reduction around several dozens of percents in general case for good optimization software. JPEG format originally wasn't considered to be intermediate format. When photo cameras save images as JPEGs, it's implied that you will be able to do some JPEG processing to get good image quality and quite high compression ratio afterwards. This is actually the reason why cameras offer not very high JPEG compression ratio in order to offer a possibility for future post processing. This is eventually a trade-off between file size and image quality in photo cameras. To get the best possible image quality and excellent color reproduction, you need to store RAW instead of JPEG. If you try to recompress JPEGs from cameras with JPEG optimizer and with conventional JPEG compression software, the difference will not be so significant, as you can see at advertizing. Brief info about JPEG optimization software to be worth mentioning
Other blog posts from Fastvideo about JPEG |